 There are lots of reasons to photograph birds. For one, it’s lots of fun (although all-too-often frustrating as well). Photos can provide a record of birds you’ve seen, especially if, like me, you start second-guessing your best sightings the minute the bird flies away. They provide proof to ebird and records committees that your rarity was indeed what you thought it was.
Perhaps you’re birding in an unfamiliar location. You may not immediately recognize all the birds you see, and photos might allow you to ID some species later, when you’re not in a hurry.
Photos can also be artistic. Everyone can be creative—it’s part of our DNA—and photography makes a wonderful creative outlet.
While most of us can point a camera at a bird and click the shutter, there are various techniques that help us create better photos. Here are a few pointers to get you started. I’ll be posting more in the days ahead.
 First and foremost, learn your camera! Don’t wait until that thrilling lifer is preening on the branch right in front of you. The best time to learn the ins and outs of your camera is now. Read the manual. Try out all the settings. (Yes, that means taking it off Auto!) Learn how to quickly switch between aperture and shutter priority, and how far you can push the ISO before your photos become unacceptably noisy. Train your hands so you know where the critical buttons and dials are without having to look.
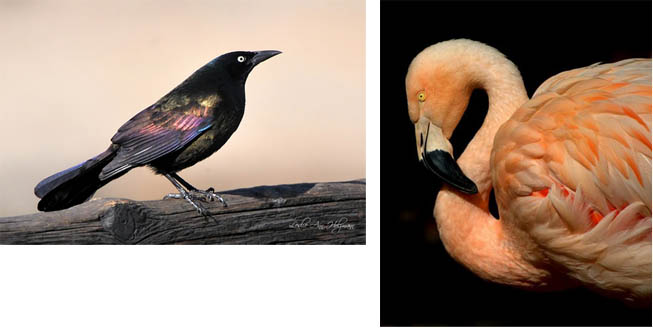
Try different scenarios. Take pictures of brightly lit birds on dark backgrounds, and shadowed birds against sunny skies (below). Learn how to adjust your camera settings to get the exposures you want. Most DSLRs have an exposure compensation option.
 How about focus? I prefer to set my camera to spot focus, and then do my best to center that on the bird’s eye. That isn’t as easy as it sounds, especially if my subject is a hyperactive warbler or chickadee. If the eye is sharp but the rest of the bird isn’t, I might want to increase my depth of field (by increasing my f-stop). Or, if the bird is blurry, but the stationary objects in the image are sharp, I need to increase my shutter speed to freeze motion—or not. (I prefer hummingbird wings to blur a bit, conveying the impression of their incredibly rapid wingbeats.)
Don’t take just one photo at a time. Find out how to set your camera to take continual exposures. If the bird is moving, changing its posture, flapping its wings, take an entire series of shots. When you later look at them on your computer, one will stand out as “just right”—the bird’s head will be tilted in a pleasing manner, the wings will be at just the right angle. (This works well with young children, too.)
Here is a series of a Red-breasted Merganser swallowing a relatively large fish. (She was having quite a bit of trouble choking it down, which made my job easier!) Which photo do you like best?
 Learn how many photos your camera can take in a row before the buffer is full and the shutter stops clicking. It’s maddening to discover you’re “out of shots” just when the momma hawk returns to the nest with fresh meat! Always leave room for more.
Practice on your backyard birds—or on your doorknob if that’s all that’s available! Practice until your fingers obey your brain without you having to think about it. Develop the same kind of muscle memory that athletes depend on.
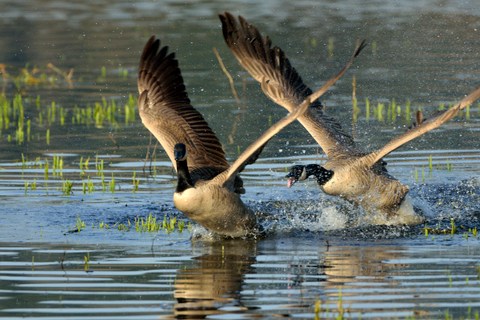 Canada Geese are such a successful species that we train dogs to chase them from parks and golf courses. Until I laboriously deleted all but the best, I had hundreds of photos of Canada Geese. But I’m still taking more. Why? They make terrific practice subjects. Zoom in. Zoom out. Capture them taking off, landing, and in flight. Nail those critical moments as aggressive males chase interlopers away from their mates. Try out your technique on common birds so you’re ready when the rarity lands in their midst.
Finally, try to take at least one photograph every day. Unused skills become rusty, and you’ll find yourself making mistakes just when it matters most. Don’t be afraid to try something new. Remember, you can always delete the ones that don’t turn out—and you never know when you’ll shoot that National Geographic cover image!
Continue for the answers to last week’s Garden Jargon quiz:
- Heirloom – An open-pollinated plant variety that has remained unchanged through hybridization for at least 50-100 years.
- Trunk: the bole of a tree.
- Bolt: When a plant produces flowers or seeds prematurely instead of a crop. This is usually the result of excessive heat and sun exposure.
- Stake: To tie plants (often tomatoes) to a wooden (or other) post so they don’t flop.
- Sport: A new cultivar, caused by a spontaneous mutation that results in a new and desirable trait passed along to the next generation.
- Rake: A long-handled implement with a row of projecting teeth at its head, used especially to gather leaves or to loosen or smooth earth.
- Thin: To remove extra seedlings, giving the remaining plants room to grow.
- Scion A detached living shoot of a plant, especially cut for the purpose of being grafted onto stock or another plant.
- Prune:To remove unwanted branches, etc. from a plant, usually a tree or shrub.
- Crown: Where the roots and the above-ground stem meet.
Bonus word: Stocks: Sweet-smelling annual or biennial flowers in the genus Matthiola, usually M. incana.
