 As I’ve mentioned before, there are lots of reasons to photograph birds. Perhaps you just want a record of what you’ve seen, or proof of a rarity to convince those eBird auditors. Maybe you can’t ID the bird at the moment, and you want to give it another shot once you get home. In cases like these, it doesn’t really matter how pleasing your photograph is as a work of art.
But maybe, like me, you don’t just want a snapshot of the bird—you want a good photo. You’re paying attention to the lighting and the background, and to what the bird is doing. You’re hoping to create a work of art. In that case, it helps to think like an artist.
Our daughter has a degree in fine arts. She spent four years at a university learning about color, shape, texture, space, form, and how to keep her apartment clean without her mother nagging her. She studied design elements such as unity, balance, hierarchy, scale/proportion, dominance, similarity and contrasts. She now works as a graphic designer and makes more money than we do.
I do not have an art degree, and this list is flatly overwhelming. Since our daughter didn’t have time to write a guest post, you’re stuck with my suggestions. Here are a few simple concepts to keep in mind when composing a photograph. Keep in mind that these are simply guidelines. Don’t let a bunch of rules inhibit your creativity!
The Rule of Thirds.
As a 5-year-old with my first camera, this was the first concept my parents taught me. For some reason, our brain often prefers the subject of a photo (or painting) to be off center. If you draw a tic-tac-toe grid over your image, placing your subject where the lines intersect will somehow feel “right.” This is such a popular concept that many cameras have a grid built right into the view finder or screen. Here a White-breasted Nuthatch illustrates this point:  If you can’t place the center of interest right on the intersection, then align it with one of the grid lines, as with this immature Prairie Falcon:
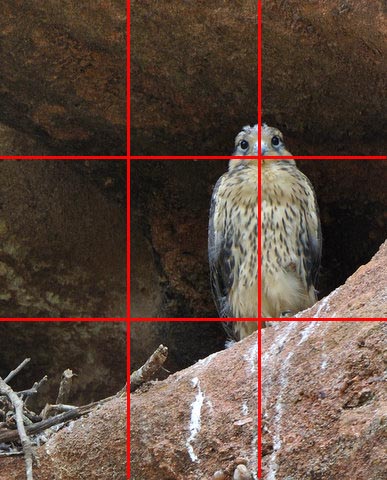 Note that our eyes are automatically drawn to the head or eyes of a bird or other animal, so use that as the center of interest. If you can’t have the entire image in focus, make sure that the eyes are sharp.
There are times when the most appropriate place for the subject is right in the middle of the photo, so this “rule” isn’t always your optimal approach.
Cropping
How we crop the image can change the feel of a photo. Should the subject always be contained within the borders of our picture? Moving inward, allowing some elements to “break the edge” can focus our attention, add tension, or create an abstract effect. (It can also look like a mistake!)
In this example, we don’t need to see the closer wingtip (it looks just like the other one), and zooming in allows us to focus on the Gyrfalcon’s fierce expression.
 Leaving extra space around your subject allows you more options when you go to crop. Depending on how you intend to use your photo, space allows you to decide if you want the finished print to be a 5×7, 8×10, or 16×20. You can even place the bird according to the Rule of Thirds after the fact, even if it wasn’t properly situated in the original photograph.
Framing.
Another helpful concept is to frame your subject. We put frames around works of art to draw attention to them and separate them from the wall in the background. We frame our subjects for the same reasons. The classic vacationer’s view of Yosemite Valley as seen from just inside a tunnel is a perfect example. Frames can be anything, from a bent reed to some pine needles, or even the blue sky surrounding a flying (or landing-while-scratching-an-itch) bird.

In a few weeks, I’ll offer some more tips. Meanwhile, give yourself a homework assignment: go take some photos that incorporate these compositional techniques. Practicing now will ensure that they come to mind the next time you’re out taking pictures.
_____
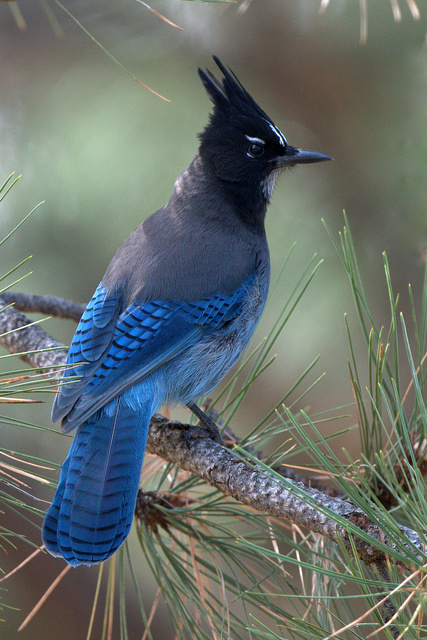
Birds: top – Secretarybird, Denver Zoo; bottom – Steller’s Jay, Black Forest, Colorado; White Ibis – Merritt Island NWR, Florida.

Pingback: Capture Perfect Bird Photos in City Parks Today - skylinefeathers.com